Showing posts with label Projects. Show all posts

Saturday, October 15, 2011

Nifty Idea (organizing your cords)

Check out this nifty idea!


We have a laptop, so we unplug the cords frequently.  I always try to tuck the cords under a lamp or the computer speakers.  Hello!  Problem solved!  (And since I was a teacher, I just so happen to have some of those clips on hand!)


Monday, September 5, 2011

Quick CASH! :)

Want to know how to make some quick cash?  One word...

Craigslist.

It's simple, convenient, and if you price your stuff right...it's quick!

Point in case, last night I listed these two items:


$40 for the mini-fridge (retails for $75 new)

$150 for the swing set (retails for $560 new)

Both of these items were given to me and I got great use out of them.

By the time morning rolled around, we had about 10 interested buyers for the swing set and a hand full of people interested in the fridge.  WHAT?!!!!  Heck yeah!

It always makes you question whether or not you should have asked more money, however I have learned to remind myself of the following:

1. Choose a price that you are willing to live with.  Ask that price.  Don't regret it later.
2. You want to sell it quickly!  If you are willing to sit on it for a while, go ahead and ask more.  
3. Good deals are a blessing to other people! (I always feel so blessed when I find a good deal.  It's kind of like the "pay it forward" concept. :)
4. You'll usually get more selling it on CL than if you split the profit with a consigner.

So go ahead and try it!  It can't hurt.  All you have to do is:

-take a picture of the item (Trust me...no picture = WAY less likely to sell)
-post it ("sell it" in the description)  I often will include a link to the original item so that buyers can read the reviews and see the original description
-be honest about the condition (you don't want someone to get to your house and end up not buying it)
-know ahead of time what your bottom dollar is
-be willing to meet someone for pick up (if you don't feel comfortable with a stranger coming to your house)
-make sure they pay in CASH!!!
-I also include Caleb's cell phone number in the add and let people know they can call or text for more info.  This has helped things sell very quickly!

There ya go!  Happy selling!  Share your CL stories with me.  I'm posting a couple more things on there tonight.  Hopefully I'll have the same success that I've had in the past.  I've always sold my stuff in less than 48 hours.  That, my friends, makes me happy! :)

Thursday, July 14, 2011

A quick and easy change...

See the word "SPRING" below?  It used to be sitting on top of my kitchen cabinets.  Seeing as how it's not Spring anymore, I finally decided to replace it.


I bought the word "Gourmet" below on sale at Hobby Lobby, but it didn't look as good since it was black.  So what did I do?  Yeap!  Whipped out the paint!


First, I put a couple coats of white paint on it.  The one below is just the first coat.  See why it needed more?  haha


Then I added some color! :)


I think I'm going to redo the pink letters to make them a little more red, but that's for a later project.  :)


Now if only my cooking was a little more "GOURMET".  ;)

Wednesday, July 13, 2011

From Office to Playroom...

Our house is small.  Cute...but small.  So as soon as we found out we were pregnant the first time, I was determined to not have a living area FULL of toys.  Pfff!  What was I thinking?  As Mia Jubilee grew, so did the amount of toys in our house.  No matter what kind of organizational system I tried to use, there were still several toys lying around without a "home".

In January we found out Baby #2 was on the way!  YAY!...wait.  More toys?!!!!

We live in a 3 bedroom house.  Room #1: Master.  Room #2: Nursery.  Room #3: Caleb's office.  WHERE was this new baby going to go?  We had to make a decision.  Sooooooo.....Caleb's office became the... PLAYROOM and Baby #2 will share a room with Mia Jubilee. :)  Ha!  You thought Baby #2 would get her own room?  Not yet.  Hopefully one day, but for now all of these toys needed a home.  (NOT a home in my living room.)  haha

I'm kind of impulsive when I get an idea in my mind, so within a week of deciding it was going to be the playroom, I had started packing up the office.  Goodbye desk, filing cabinet, furniture, guitars, djembe, and papers!  Fast forward about a month and this is what we have so far...

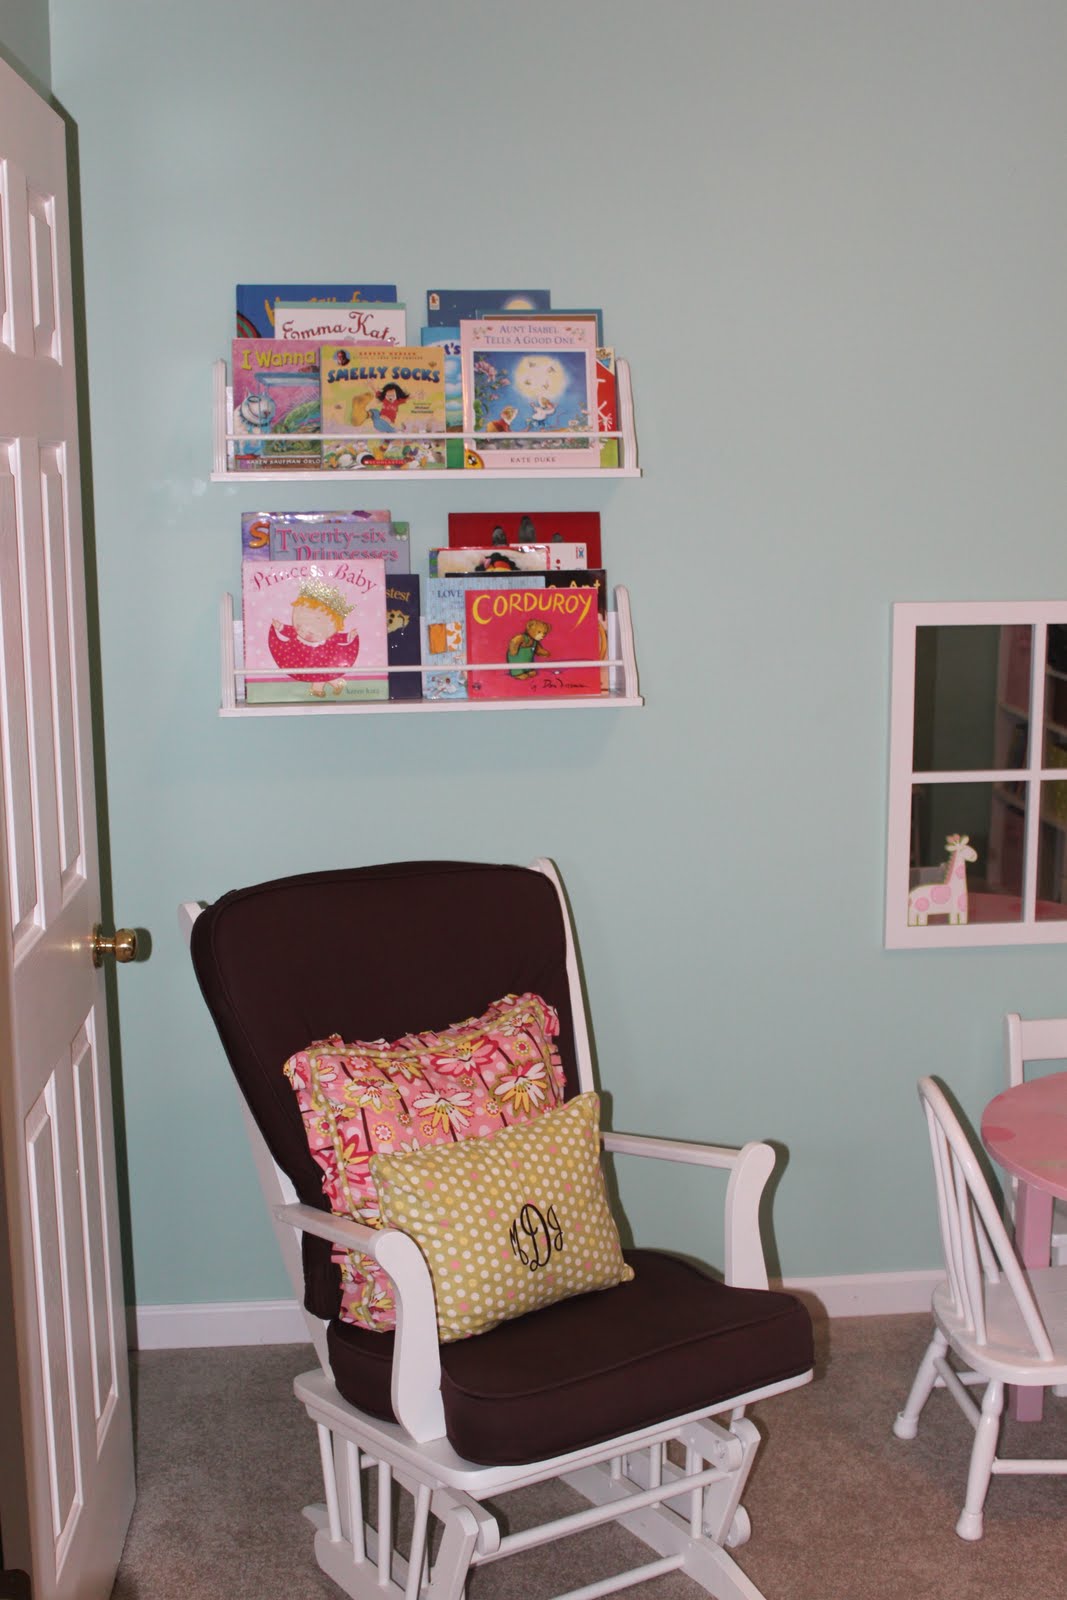
- The rocking chair came out of Mia Jubilee's nursery so that we could add a 2nd crib.
- The table came with 2 Pottery Barn chairs from a yard sale.  Table + chairs was only $20!  I painted the table, am going to sell the chairs (they are $50/ piece at the PB outlet) & then I found FOUR chairs for $20 at a yard sale.  :)
- See those bookshelves that we just made?  I may even add a third one under the two that are already there.
- And I LOVE the color.  I messed up trying to find a color for the kitchen, so I just used the paint for the playroom. :)


Check this out...

- The shelves on the left and right were given to me a couple years ago.  They were brown, I painted them, added an extra shelf, etc.
- The dresser in the middle was also given to me a couple years ago.  Painted it and painted the knobs (I need to add the other two).  Who would have thought that the shelves would fit PERFECTLY on that wall?!!! Seriously...there is only an inch on each side.
Shelving system = FREE!


Below is the lamp in the room.  I bought it at Target a few years ago.  First, I added this cute owl tape to the bottom, but after a week or so I changed my mind and added pink ribbon to the top and bottom. My sister has a TON of ribbon at my mom's house (she used to make bows) so I just "borrowed" some of it for the lamp.  THANKS, JENNI!!!! :) :) :)


 These letters that spell "PLAY" were so fun to make!  I saw a similar idea while cruising through random blogs one day and decided to put my own spin on it. :)  If you want to make them, just print out whatever letters you want onto card stock.  Start by gluing all of the large buttons first.  Then fill in the cracks with smaller ones.  Lastly, use brads that are buttons to fill in the tiny cracks.  Voila!  Cuteness! (I got my buttons and brads at Hobby Lobby.  I waited until they were 50% off to save a little bit of money.  The frames were only $6 a piece at the Dollar Store.  You can probably find some cheaper ones and just paint them though.)  The finished product is so cute up close because it is 3D. :)


Mia has had her polka-dotted piggy bank since she was in my belly.  We used to put a dollar in it on each of her month birthdays, but after a year I kind of slacked off a little.  Hey...it's kind of like started a savings for her, right?

Of course I had to buy Baby #2 a piggy bank for her stash of money as well!  We'll see how well our girls are at saving/ investing their money.

Hopefully they'll be a bit less impulsive than I was as a child. :)

This is the third wall in the playroom.  It is a little "blah" right now, but will soon house Mia's play kitchen that we hope to get her for Christmas. 

For now, this is the perfect place for Mia to watch her fish.  (She LOVES them and tells them good night on a regular basis.)

The table was given to me and was the perfect size to house the tank.  The fish tank came home with me after spending 6 years in my classroom.  Those are some smart fish!
These next two pictures make up the fourth wall.  The chalk board is from PB and was another great yard sale find for $15!  I painted another coat of chalkboard paint on it to touch it up and hung it behind the door to hide the mess that will eventually come when Mia Jubilee starts drawing on it.  I love that it is magnetic too!  We keep her stickers on it, and Mia Jubilee likes to play with the magnets.


The picture on the right is actually inside the closet!  The door stays open so that Mia Jubilee can play inside.  There is a play stove and all of her cooking stuff is in the buckets below.  There are stuffed animals on the right and storage stuff on the left.  (I hope to eventually finish cleaning out the closet, move the fish tank inside, and create a fun area for her to read books.  She already likes to go inside and close the door.  It must feel like a little club house to her.)

 This mirror was taken from the nursery as well.  It is all white, but right now I have a temporary piece of ribbon around the perimeter.  I may glue the ribbon, or I may paint a line.  Who knows!  What are your thoughts on it?  Plain white?  Ribbon?  Paint a stripe?

(Can you see the painting above the door?  Caleb did that in high school.  I love having something that he did when he was young.)


Here are a couple close-ups of some of the details...


Fish 

Mia Jubilee's pillow (Made by my aunt, monogrammed by my sister)

My teddy from when I was little!  Mia Jubilee LOVES him!

My little monkey :)  
*Notice how high her puzzles are on the shelf?  Only Mommy or Daddy can reach them!  This has been one of the best aspects of the playroom...having some toys that she can only reach with help. :)

Her "car" that stays on the table.  Yard sale find for $1.  One of her favorite toys!

I took this to show the storage bins.  They house balls, animals, cars/people, misc, etc!  
They will soon have labels.  Okay...maybe not soon.

It is SO easy to clean up with these bins.  Mia Jubilee actually does a lot of it herself. :)  I know...be jealous.  My 1 year old will actually CLEAN UP if guided.  Don't get me wrong though.  This girl can mess up a room in a matter of seconds.  Why do you think I've been teaching her to CLEAN?!!!

I had one of these on each table in my classroom.  The kids LOVED it!  I couldn't have 4 betas at home though, so after giving some away, we are left with this one.  
(I know...I know...he needs a refill on the water.)


So there you have it!  From office to playroom!  I have really enjoyed having a room totally devoted to her toys.  It helps keep me sane.  I must admit though, we STILL have toys in our living room.  But hey...at least the majority of them are down the hall!


Here's one last look...


Have a GREAT day! :)

Saturday, July 9, 2011

DIY Hanging Bookshelves


I LOVE children's books.  Seriously...I think I have 7 large tubs FULL of them in my garage.  Luckily Mia loves books too!  I've been trying to decide how to add some of them in her playroom without it seeming too overwhelming, so I chose a tub of some of my favorites and started looking for creative ways to display them.

While I LOVE my sister's bookshelves that she made out of gutters (yes...gutters), my playroom is about 1/4 the size of hers, so I had to go with something different.  (Check out her gutter bookshelves below...)


I saw some DIY bookshelves on a blog about a month ago.  I can't remember which blog, but it may have been Centsational Girl.  I tried to remember what they looked like, headed to Home Depot, and bought my supplies!  

Here's what I came up with:

I bought a 7ft piece of trim (because it was so cheap).  I ended up needing a bit more trim though bc I decided to put a back on the shelves.  (You can get them to cut it for you at Home Depot.  I was in a hurry though, so I just took it home with me.)

I bought 3 dowels and 6 umh...I don't know what you call the ends, but they are already pre-cut to go under a piece of wood to make a shelf.  I just flipped them upside down.  (You can buy ones that are more decorative too.  It's totally up to you!)

And I bought hooks to screw on to the back as well as a box of finishing nails.  (I think my FIL ended up using screws on the bottom and the nails on the side.)  


I took the wood to my Father-in-law to cut, but to my surprise, he offered to put them together!  WOO HOO!!!!  The trim was already primed, so it didn't take long at all to slap some paint on them.  Check them out!  I LOVE THESE SHELVES!!!  (We made three, but I only ended up needing two.  I think I'm going to put the third one in Mia's room at a level that she can reach.)


Don't you LOVE them?  And they were 1/3 of the price of the ones on SALE atPottery Barn Kids.


THANKS, Dan!!!!  I LOVE my new shelves! :)
So go ahead and try it!  You can make the gutter bookshelves or these.  Send me pics if you do!  I love to see how people put their own spin on things.

P.S...Have I shown you the new playroom yet?  It used to be Caleb's office, but I have been turning it into Mia's playroom for the past month.  Maybe that will be a post next week! :)

Tuesday, June 28, 2011

Chair Makeover

Even though my husband thought this chair was "old" and would go nice in a more formal setting, I quickly accepted my mother-in-law's offer when she wanted to give it to me.  I loved it!  It had so much character!  All it needed was some cute fabric and a paint job.  Check it out...

Chair in its original state.  GREAT condition!


I put two coats of paint on it.  
(I hated to paint over the nice wood, but it just didn't look good with my new fabric.)


Found this fabric for 50% off!

I didn't take the other fabric off, I just stapled this on top of it.  It definitely took a bit longer than I anticipated, but I got it done in about 45 minutes (WITH a toddler running around!)  She did however spill the cat's water all over the kitchen floor.  ha!


You can see the chair in this picture I took of the T.V. cabinet makeover.  I haven't made a pillow for it yet, but I'll get to that soon.  :)  I may still distress it as well, but for now I am busy tackling other projects.  After all, I just realized the other day that I am already in my THIRD trimester!  Where did the time go?

P.S...I love how the bird in the painting is the same color as one of the stripes in the chair.  Funny how it matched so perfectly.

Wednesday, June 15, 2011

Kitchen Table Makeover

When I bought my house 6 years ago, my dad bought me a kitchen table.  He got a crazy deal on it. (I think he got it for around $65.)  It's been a great table, however now that I am home everyday, I have noticed how small my house is.  In order to create more kitchen space, I started the hunt for a pedestal table.  Good grief!  Do you know how expensive those things can be?  Even the ones on Craigslist are at least $200!  However, I happened to spy one for $75.  I emailed the lady right away, but a few hours later I found one at a consignment store that was 10 minutes from my house.  (instead of 45)  They were asking $110, but when I told them there was one on CL for $75, they matched the price!!!!  (My mom ended up getting the one that was on CL.)

Here is the beauty in its original state.


Not what I was looking for, so I started sanding!!!!


2 chairs came with the table, and I found 4 more at a yard sale for $20!!!!  (That's an incredible deal.  Just start pricing chairs...you'll see!)  So my awesome mother-in-law got started priming and painting the chairs.


Look how pretty the wood was once I sanded it!!!!!  I painted everything but the top, and I lightly sanded it to give it a distressed look.


Then I stained the top.  I would have chosen a lighter color, but my sister-in-law already had a can of this, so I jumped on it.  Free stain?  Yes please!  I topped it off with a sealant.  We LOVE it.  We have a TON more space in our kitchen. :)  (The finished product is actually a little lighter.  I ended up sanding it down a little more bc it was just too dark for me.)


Best part about this makeover?  

Dad bought table for $65.
I used table for 6 years.
I sold table on Craigslist in 2 days for $165.
I bought new table $75 + 4 chairs $20 = $95 on new table.

$165 (what I sold old table for) - $95 (what I spent on 'new' table) = $70.  Yeap!  I MADE money off of getting a new table. :)